Partner: The amazing, talented, and hilarious Jennifer Chien

Description of the Project:
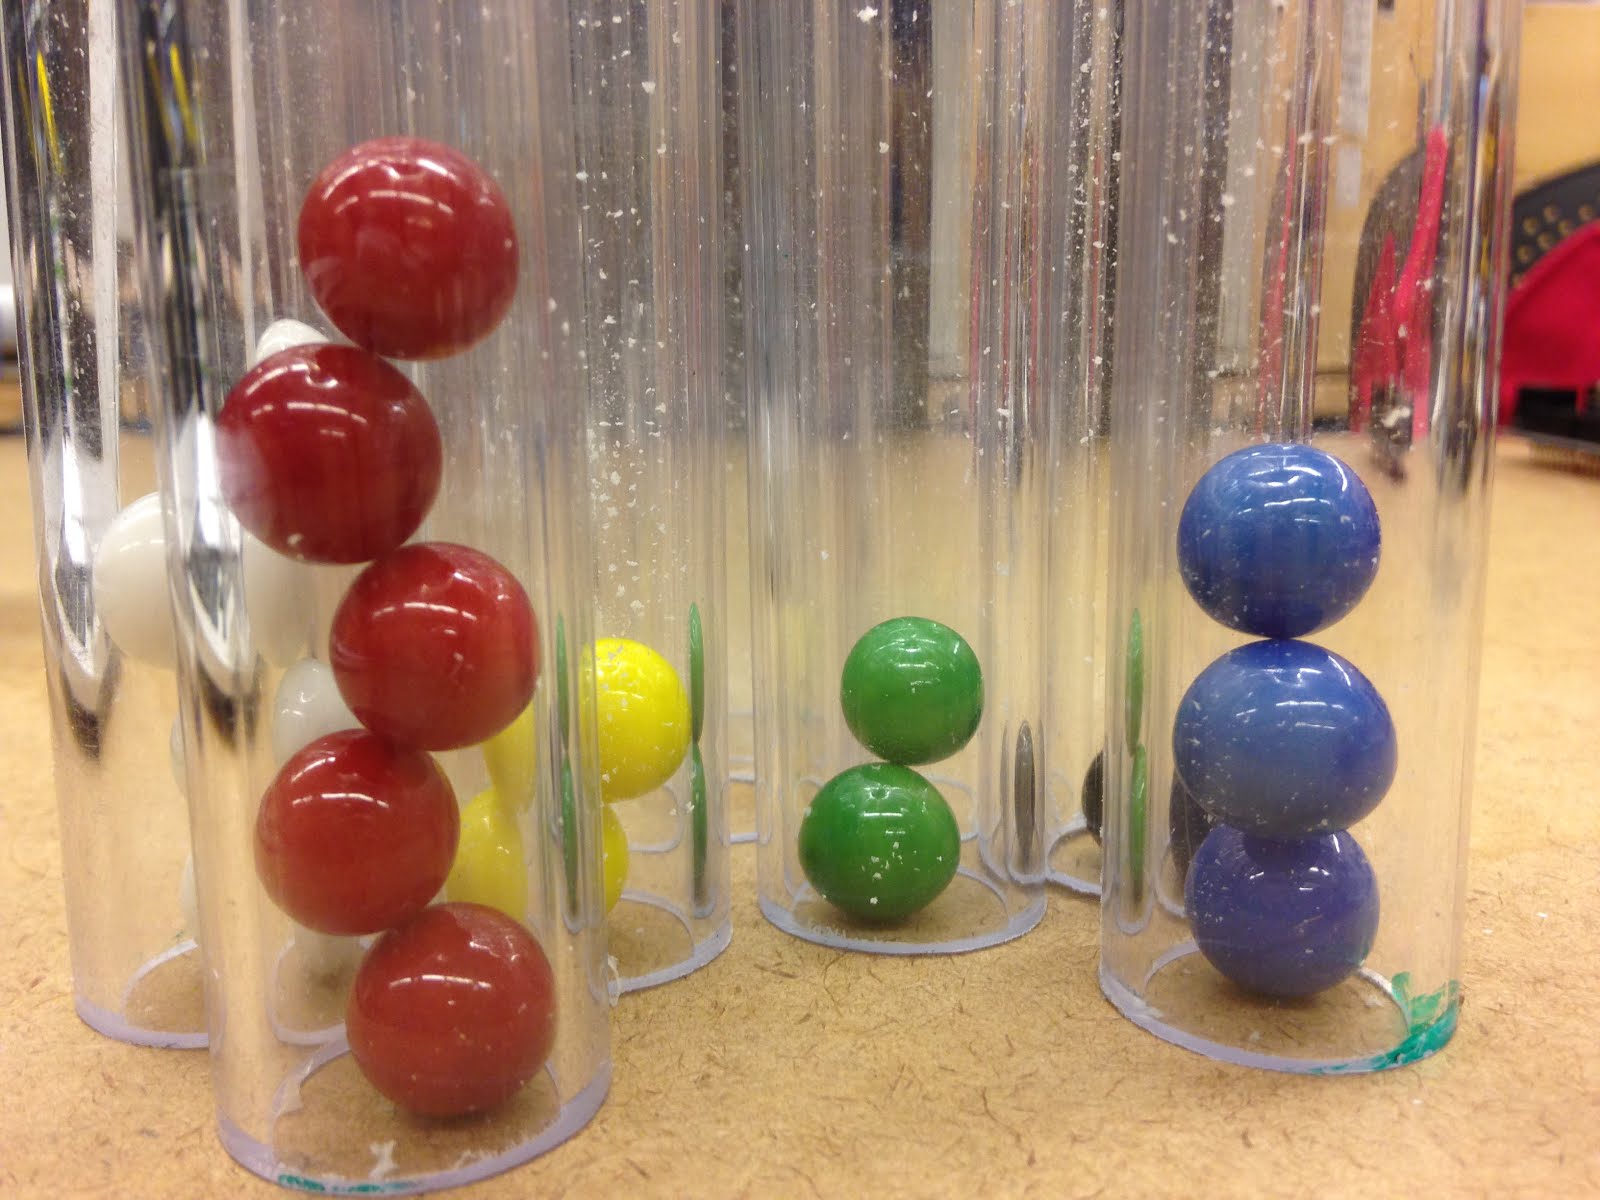
For our final project, we worked with Becky from the Child Study Center to create a device that could help children understand how much time is left throughout their activity and day and how much time and activities have passed already without having to constantly ask their teacher about it. M.C. Time (Marble Clock Time) is a device that uses marbles to represent time. The marbles at the top of the device show the amount of time that is remaining in the day and activity and the marbles at the bottom show the amount of time has passed for the current activity and the day.
Highlights of Week 1: Brainstorming


But as we began creating our first prototype, we found that a a conveyor-belt-like mechanism powered by a motor could be created using the Legos from the cabinet. And so we ended week 1 with this prototype:

Highlights of Week 2: Planning and Prototyping
 Many things changed from our prototype from week 1. We changed our long tube at the top of the device to instead be a row of tubes with one tube representing one activity. Instead of one container to hold all of the released marbles, we also decided to use a row of tubes. We also changed our sensor from a weight sensor to a color sensor and then finally a light sensor. The light sensor would be placed underneath a tube on top of the releasing mechanism portion and it would sense if there was a marble still in the tube or not. We also thought of potentially having the light sensor on the side of the tubes and on top of the releasing mechanism.
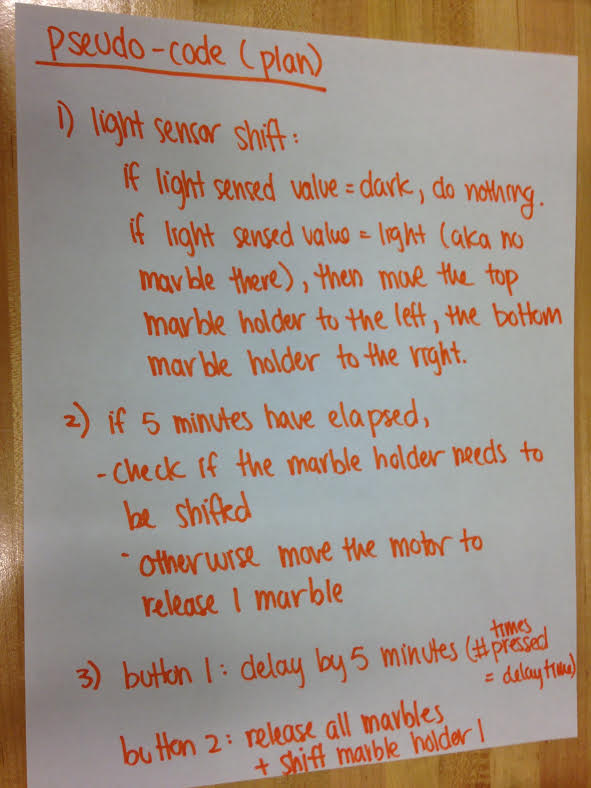
We also planned what we wanted the code to do:

We finalized our materials order to a 6 foot clear PVC tube and a bag of different colored marbles.
Highlights of Week 3: More Prototyping
This was the week we realized things were easier planned than done.
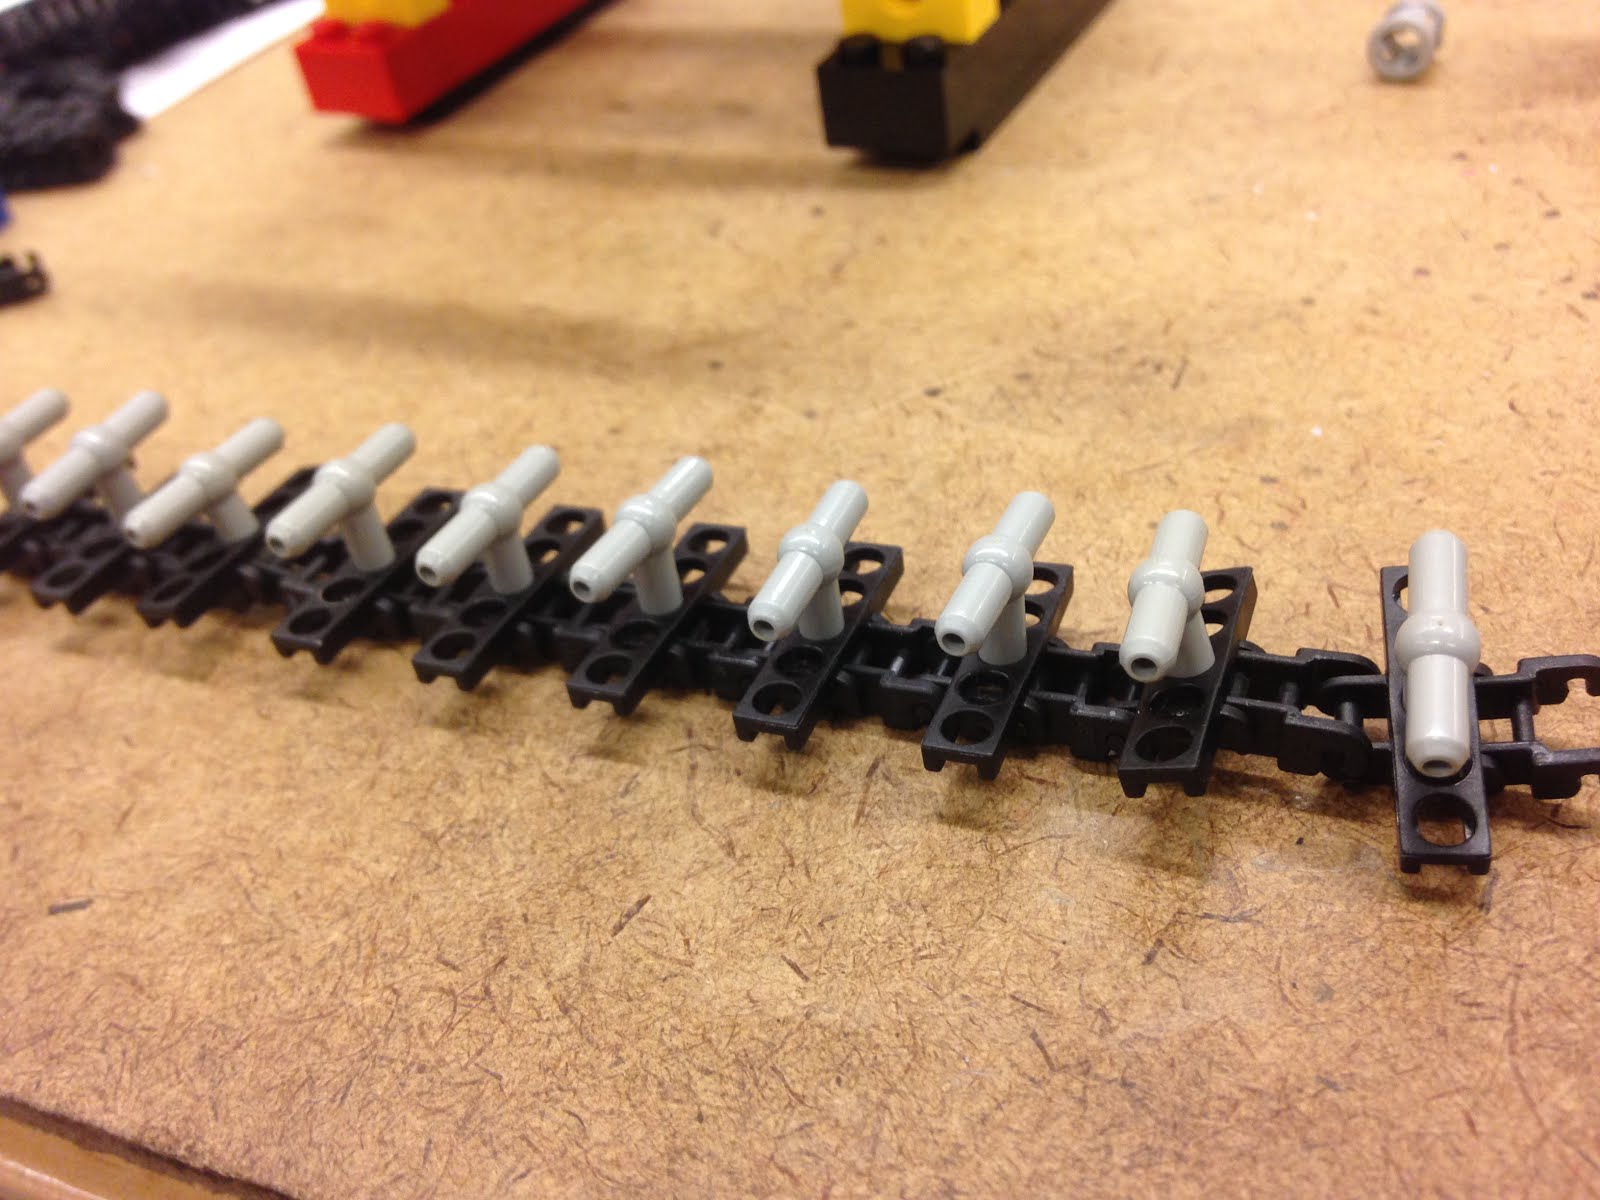
 We finalized our releasing mechanism. We found T-shaped Lego pieces that we could attach to the conveyor belt track. These pieces separated the marbles and when we placed a thin Lego across the structure, only one marble was able to be released. We decided to have the light sensor placed parallel to the tracks and right on top of them. We found that when a tube of marbles were released, 6 marbles would be in the structure but they were not sensed by the light sensor since the light sensor sat higher than their positions. In the code, we then wrote that when the light sensor sensed that there was nothing in front of it, release six more marbles before moving the tube holders.

 |

 The other really big problem we had was figuring out how to hold the tubes to the structure. We decided to use the same conveyor belt idea that we used in the marble releasing mechanism but instead have the tracks perpendicular to floor. We then thought of gluing Velcro to the tracks and tubes. This would then allow for easy removal and replacement of the tubes. We thought it was going to be pretty easy to glue the Velcro to the tracks but we spent hours and it still did not work by the end of week 3. We first glued a large strip of Velcro all around the tracks but when we turned the motor on to see how it worked, the tracks would just pop off. We found that this is because the separation between tracks would get smaller as it rounded the gears and so having the Velcro glued to the tracks put too much stress on them. We then tried gluing the Velcro but not having it completely flush to the tracks to provide the tracks with some room. This also did not work. We then tried just gluing small pieces of the Velcro to the tracks but this only worked for a few runs.
We also created a little funnel out of a paper water cup that will allow a released marble to go directly into a tube. And we created a basic code where if the light sensor sensed that a marble was in front of it, turn the motor to release a marble and if light sensor did not sense a marble, release six more marbles and then power the motor that turns the tube holder belts.
Highlights of Week 4: Iterating and Tweaking

 Because the tubes kept getting stuck to the bumps of the Lego platforms, we also created a a rectangular piece of Delrin that sits below the the tubes which provides a frictionless plane for the tubes to slide on.
 For creating the pause and fast forward buttons, we found that the buttons had to be continuously pushed in order for it to be deemed as on/pushed but we wanted to have the button only pushed once and have the device pause or fast forward. The ever amazing Jennifer found a code that counts the number of times a button is pushed and compares the current state of the button to its precious state. For the fast forward button, when it is pressed, a marble would be released. And for the pause button, when it is pressed, both motors would be set to 0 and there would be a delay equivalent to the delay we had for the marble releasing.


We instead used boxes to hold up the structure because the plastic containers we used before curved a lot which made it difficult to stabilize the structure. The cardboard boxes were much straighter and provided a complete flat surface for the Legos to sit on. We also made a little Lego support for the light sensor/marble release part.

Because Becky said that since the whole structure was very interesting and distracting and she wanted it to be less conspicuous, we just decided to make a large white board with cutouts to show only the important parts. The cutouts showed only the tubes at the top and bottom and hid the rest of the device. And we cut out arrows to emphasize the tubes for the current activity.
Highlights of Week 5: Tweaking and Finalizing
We decided against using one funnel since it gave us a lower chance of having the marbles go into the tubes. Instead we decided to make little funnels for each tube at the bottom. We first tried this idea out by making a little funnel using foil and it worked great. It was kind of time consuming creating one cone out of foil and since we had to make five identical ones, we decided to cut up paper cones that we found in the room.


We realized that the delay/pause button could not be pressed while it was already in the pause loop so instead we changed the code to just have the delay for specific amount of time instead of the time equivalent to one marble.
We then had to find the perfect position for the tubes. We glued little pieces of tape to the Velcro to indicate where exactly a tube should be placed. We had a very hard time positioning the tubes. We found that the motor controlling the tubes did not perfectly move the same distance for each turn. The motor tended to work great for the first two tubes. Sometimes it would work great for the third also but by the fourth tube the motor would not turn the tracks all the way and would have to turn twice to get the fourth tube to line up to the hole of the releasing structure. And sometimes it would be very nice to us and work perfectly fine.
We were thinking that the motor was not consistent due to not getting enough power from the batteries. We tried new batteries and had to adjust the powers we set the motor to be but it still did not work perfectly. We then thought it might just be the amount of strain the weight of the marbles and tubes placed on the motor. It could also be because of where we placed the motor. It sat on top of the bottom tubes and did not have very much support holding it but it was the only place where it would not get in the way of the moving tubes. The inconsistent motor and position of the tubes were a consistent problem even til the public exhibition. But luckily during our presentation, the tubes were able to line up correctly but this was probably because we only placed one marble in each tube so there was less weight for the motor to push.
Final Design and Improvements:


I'd really like to improve the mechanism of the tube holders. Given more time, I would love to try using perhaps two separate motors for the top and the bottom belts and see if that would work better. I would also like to try using one long tube for the marbles at the top and using a color sensor. I wish we could've had more time to try either of these approaches. It would also be really nice to have a more aesthetically pleasing board perhaps made out of Delrin or wood but both of those would cost much more money.


Overall I am extremely proud of us and our final design. Even though it does not perfectly work the way we wanted it to, I'm still so proud of what we made. We put in so many hours to make this device. We tackled so many problems. We created a machine that sensed its surroundings using a light sensor and buttons, was controlled by an Arduino and Bricktronics shield via bang-bang control, had a marble releasing mechanism and tube shifting mechanism using motors, and helped children understand the concept of time. And if we don't factor in the cost of the Legos, Arduino, and Bricktronics shield, it only cost us about $30 to make.


